Mr Right Now Digital Collage

Just created my digital collage for this week's Digital Collage Challenge, Lazy Days, over at Collage Obsession. They provided an image we needed to use, which is the imaged dubbed "Ursula." How we used her is up to us. But my creation is called Mr Right Now.

Mr Right Now Digital Collage


My Ursula is spending her lazy days waiting...for Mr. Right Now. ;) I used a black and white photograph of my own of some wet leaves to be my background for the image. Then I added a flower to Ursula's hand, because she looks like she loves flowers. And then I just did a creative frame effect around the entire digital collage.

Grungy Bunny Bag

Here's a project that I did specifically with Easter in mind. It's my Grungy Bunny Bag.

Grungy Bunny Bag Fabric Crafts


I made this out of 2 pre-made 5x7" drawstring muslin bags, one for the face bag, and one to cut up for the ears. I started by using my Coffee Shop-colored Glimmer Mist to grungy up the bag. What can I say? I didn't like the plain look of the bag. ;) I drew on the facial features lightly with pencil, then painted them in with craft acrylics.

Next, to make the ears, I cut two ear shapes out of the other muslin bag and grungy'd those up with the Glimmer Mist too. Then I created folds at the bottom of each ear to give them more of a dimensional ear shape, and cut a hole through those folds with a regular hole punch. This hole gets used to join the ear to the bag itself with a brad. Then I cut a small slit into each side of the bag face, just below the drawstring casing area, near the top of the bag. Next I took a brad, poked it through the holes in the ear folds, and then poked it through the slit in the side of the bag face to connect the ears. Closing the prongs of the brad inside the bag face secures the ear to the bag. And I just repeated that for the other ear, and tied the bag closed.

This Bunny Bag is really meant to be a gift bag. I stuffed it with regular fiberfill just so I could take a picture of the full bunny face. But you could fill it with any Easter candy, like chocolate eggs, or Jelly Beans, or M-n-M's or something. The muslin bags are very affordable and there's no sewing involved in this project. It's a really quick, easy, and fun Easter craft!

Robin Eggs Nest in a Jar

I've really been trying to focus on spring crafts in my studio lately. I don't usually do a lot of spring crafts, nor do I tend decorate my home too much this time of year. But I decided that if I created some spring crafts that I love, then I could use them in the house. And at some point I'd have a lot of lovely little crafty goodies to use this time of year.

So my latest spring craft is my Robin Eggs Jar, which looks a lot like a little nest in a vintage jar.

Robin Eggs Nest in a Glass Jar

This was really so easy to make. The jar isn't vintage, but it does sort of look like it is, and I had it in my studio just begging to be used. I added some Spanish Moss to the bottom of the jar to give it that nest effect.

Next it was time to paint some eggs. I used wooden eggs that are about 1-3/4" long. I painted them with craft acrylics in a robin's egg blue, and then I took some watered-down brown and spattered on the spots using an old toothbrush. Love the speckled-egg-look! Then I just added the eggs to jar.

I think this will find its new home in my kitchen. I love the look of it, and I have lots of bird and birdhouse stuff in my kitchen, so it will be perfect.

Blue Forest at Sunset

This is another of my Nature oil paintings that is also mixed media.  I've called it Blue Forest at Sunset. It utilizes the same techniques I used in both my Fall Leaves Mixed Media, as well as my Trees in Orange paintings.

Blue Forest at Sunset Mixed Media


I love being able to combine texture into my painting, which this technique with tissue paper allows me to do. I have some ideas rolling around in my head for future projects using this technique. Hopefully I can do some experimenting later this summer. That's always the challenge though...too many ideas, too little time!

MJ Smile Digital Collage

This week's Collage Obsession Challenge is Tramp. The creation has to feature either an image of Charlie Chaplin as The Tramp, or it has to express the word "Tramp" in some other way. As soon as I saw this theme, I knew exactly what I'd be doing. But before I share it with you, I need to share with you a little bit of trivia about Michael Jackson and Charlie Chaplin.

  • Michael Jackson was a huge Charlie Chaplin fan.

  • MJ loved the song, Smile, which was composed by Charlie Chaplin.

  • Michael recorded Smile in 1995, but he never performed it live. However, near the end of his History tour, the song was played at the beginning of the concert, in memory of Princess Diana.

  • Smile was sung at MJ's Memorial on July 7, 2009, by his brother, Jermaine.  Michael's version of the song then hit the Billboard Hot 100 Digital Songs, along with the UK and Swiss singles charts.

  • In addition to being a musical artist, Michael was also a visual artist.

  • Michael drew Charlie Chaplin many times.
Michael Jackson Artist Chaplin

MJ Artist Drawing

Michael Jackson

Smile Michael Jackson Art


I hope you like this addition to my growing collection of Michael Jackson Art. I loved creating it!

"The meaning of life is contained in every single expression of life. It is present in the infinity of forms and phenomena that exist in all of creation."
~Michael Jackson

Wooden Crate and Milk Bottles

Time for another entry on the Trash 2 Treasure challenge on the Sassy Sites blog. This time I'm showing off an old wooden crate and some vintage milk bottles that were destined for the city dump when my husband got a hold of them. One of his customers was going to throw them out! So he gladly brought them home for me. I put my creative touches on them and now they sit in my kitchen.

Wooden Crate MIlk Bottles Trash to Treasure


I didn't want to do too much to these treasures, because I love the vintage look of them already. But I did want to do something to jazz them up a bit. So I took some fabric I had with sunflowers on it and cut out various sunflowers. Then I decoupaged them onto the wooden crate, and also added one to each milk bottle. And then I just added a bit of stippling using acrylic paints to add some yellow and green around the flowers on the crate, just for a little pop of color.

I love how these turned out. They are a fun conversation piece, and they fit right in with the country prim and vintage feel of my kitchen.

Flower Fairy Digital Sketch

This is one of two digital sketches I'm adding to my digital sketchbook today. I'm calling it the Flower Fairy.

Flower Fairy Digital Art


This began as a digital photo I took last summer. I have a window box outside one of my studio windows and I had planted some Vinca there that was in full bloom. I also always have a little resin fairy perched on the ledge of the box. Not sure if she's sulking or daydreaming, but she's cute either way.

I played around with several filters in PhotoScape before finally giving it the sketch-like effect. I really love how the purplish hue in the background contrasts against the white tones of the fairy. And I also like the many flower petals and leaves help to create texture in the background.

I'm also linking this to the Collage Obsession "Many" Challenge this week.

Collage Obsession

Tempest in Oils

This oil painting is kind of a rarity for me. Normally I paint using photos as a reference. I don't have a photographic memory, so photos really help me in trying to gauge color, size, proportion, etc. But when I painted this it all came out of my head. I call it, Tempest.

Tempest Oil Painting


It wasn't raining the day I painted it, so maybe the only tempest that was raging that day was in my head. ;) But I just kept seeing clouds and pouring rain up there in my brain, and tried to capture that with some of my favorite colors. It's not a masterpiece by any means, but I'm pleased with it. Hope you like it too.

Laugh Fairy ATC

I was in a fairy kind of mood when I created this new ATC the other day. But of course, I'm often in a fairy mood. LOL This one is called Laugh.
Laugh Fairy ATC Altered Art


I started with a standard ATC size of illustration board and I painted it a pale pink color with acrylics. Then I used a textured rubber stamp that looks like cracked paint to create the background texture using copper ink. I found a vintage photo of a girl, and some pretty blue butterfly wings and turned my girl into a fairy, and then glued her to the board. I added another blue butterfly to the girl, along with a blue rhinestone gem here and there. And I finished it off by adding some pink satin ribbon across the top of the ATC, along with the sticker alphas to spell out LAUGH.

Dreams of Spring Collage

Amazingly, Spring is right around the corner now. Yay! And the gals over at the 3 Muses Challenge Blog have chosen "Spring" as the theme for this week's challenge. So my Dreams of Spring Collage is my entry into that challenge.

Dreams of Spring Fairy Art


I started with a plain piece of chipboard that I painted with a buttermilk yellow acrylic. Then I used Tim Holtz' Tattered Rose Crackle Paint on top of that to give the base some texture, and I distressed the edges a bit with ink as well.

Since flowers and fairies are always what comes to my mind when I think of Spring, I chose a vintage photo of a fairy girl for my subject. She looks like she's dreaming of something, with that faraway look in her eyes, so maybe it's Spring? I added a glittery crown and rhinestone gem to her head, and an extra rhinestone gem to the sash of her dress.  Then I added some white lace trim and pink satin ribbon to the bottom of the image, and embellished that with some pink stain roses. And the last step was just to add some alphas to spell out Dreams of Spring.

Sew Easy Button Magnets

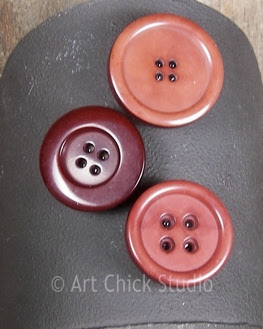
I did a last minute craft project last weekend when I was in my studio. It was just something fun to do that I came up with on the spur of the moment after seeing some buttons laying on my work space. I always have buttons somewhere it seems. So I decided to turn a few into magnets--since I have kind of an obsession with magnets anyway.

Button Magnets Altered Art


All I did was glue craft magnets to the back of these cute buttons in shades of brown. That's all there was to it! Sew quick. Sew easy. Sew cute!