Tea Time Hangtag

This altered hangtag was inspired by the Gingersnaps Creations Hot Beverages Challenge.  I thought a good, old-fashioned tea party would be perfect for my theme.

Tea Time Altered Art Hang Tag


I started with a plain white hangtag, which I distressed on the edges with red ink, and then I stamped on a doily texture to the lower left bottom edge.

Then I chose a transparency image of a vintage photo of two adorable little girls, who are clearly having a tea party. Gosh, remember those?! I added a bright red rose sticker, along with some red rhinestone gems here and there. And I also added the Tea Time alpha stickers. I finished it off with some simple black ribbon.

Tea, anyone?

Maxfield Parrish Inspired Magnets

One of my all time favorite artists is Maxfield Parrish. He was an oil painter known for creating quite luminous colors in his realistic works through a technique called glazing. He was also quite innovative, creating techniques that have never been successfully copied by any other artist. His work is quite brilliant, and beautiful, so if you have time, do Google him and his work. :) You've actually probably seen his work already, as many of his paintings are quite famous--though perhaps his name is not as well known as some of his paintings.

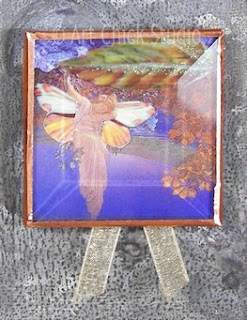
The 2 magnets I've created here utilize small calendar prints of two of my favorite of Parrish's paintings: Ecstasy and Reveries. I created these as part of the 3 Muses Artist of Choice Challenge.

Maxfield Parrish Glass Tile

Maxfield Parrish Glass Tile Magnet 2

What I did was take one of my old Maxfield Parrish calendars and cut out two of the thumbnail images from the back cover. I made slits at the edge of each figure with an Exacto Knife, and then I inserted photo images of butterfly wings to make each of them look like a fairy. On the Reveries piece, I did add a leaf sticker and a small bit of scrapbook paper near the top edge, because I needed to fill a gap since the image was smaller than the glass bevel. But beyond that I didn't do anything else to Parrish's beautiful images.

The next step involves copper foil that I use in my stained glass projects on occasion, and also an unlikely copper tape that is found in hardware stores: it's Slug & Snail Copper Tape, and its true purpose is a snail repellent of some sort. But one person's snail repellent is another person's craft supply, I always say.

Copper Foil Tape


I used the snail tape across the bag of each calendar image. I had originally planned to solder these magnets, and copper foil is needed in order to do that--but copper foil isn't wide enough for these images, as it normally in a maximum width of 1/4". But the snail tape is about an inch wide, and since my magnets are around 2" wide, it worked great for covering the back of the images with just a couple of strips.

After covering the back of the images with the snail tape, I took some copper foil and a glass bevel for each image and used the foil to wrap the edges of the bevel and adhere the image to it at the same time. The nice part about this is that no glue is necessary. And just to be sure that my bevel and image would stay in place, I turned the glass over once I had all the edges wrapped and then put flat pieces of copper foil on the back near each edge, overlapping the copper snail tape, so that it would be secure.

The last step was to add a magnet and some gold organdy ribbon to the backs, which I did with some heavy duty glue. I'll just add that I didn't solder these pieces because once I saw the copper foil next to the coloring of the images behind the glass, I just liked the way the copper complimented the colors in the images. If I'd soldered, the copper would have become silver in color, and while I do love that look, I think the copper was a much better aesthetic choice for these pieces. And they're going on my refrigerator, because you can never have too many pretty magnets there.

Connie's Abstract Stained Glass

I was going through some photos of some of my artwork and found this one. It's of a stained glass piece I created for my friend, Connie, several years ago. Connie was my mentor when I was student teaching in art, and we became friends and colleagues when I became a teacher in the same district. This was a piece I designed especially for her.

Connies Stained Glass


Connie loves abstract art, and she'd had a special stained glass piece in her home not long before I met her. But a fire ravaged her home and that stained glass piece was one of the many casualties. I was so glad to be able to make this for her. I used lots of cobalt blue and white glass, along with some varieties of clear glass and glass bevels.  I wish I had a better photo of it, but digital cameras weren't quite the rage yet then and it wasn't always easy to get a good photo. But I'm glad I have the photo anyway...I don't always remember to photograph my artworks that I make as gifts...but I'm getting better. :)

G is For Girl Bookmark

I was feeling kind of girly, and also feeling like making a new altered art bookmark, so with those as my starting points, this G is For Girl Bookmark was the result.

G is for Girl Altered Art Bookmark


I started with a piece of cardstock scrap paper that I liked. It has hints of pastel minty greens and grays, though it's kind of difficult to tell that in the photo. I cut that to bookmark size and then also scalloped the bottom edge.

To embellish, I started with some stickers: the "G", and also a postage sticker. And I added a paper accent showing some "G's" and the word "girl" as well, which I also used some distress ink on to distress the edges. I added a contrasting strip of scrap paper at the bottom of the bookmark. Then I added the vintage photo of the little girl, who's carrying a large cone of flowers, and wearing minty green and pink (very girly!).  Then I added some paper flowers, which I attached with plastic button brads. I even added a little button brad to the little girl's pants. And I finished it off with a coordinating satin ribbon.

Lion Cub Oil Painting

This lion cub oil painting is one I've had finished, but I haven't gotten around to posting it on the blog. But then I saw the 3 Muses Nature's Creatures Challenge posted and thought it would be perfect for that.

Lion Cub Oil Painting

Oil painting is quite a lengthy process, which involves building up the paint in several layers. And it dries very slowly, so it's not something that can be rushed. It's a very soothing process for me, when I'm painting. Very few things make me feel as peaceful as painting does, and that is a treasure to me...especially since I don't get to do it as often as I'd like. This lion cub is one of my husband's favorite pieces.

Rose Gardens Fabric Collage

As I begin to play around more and more with fabric in my art and crafts, I'm trying to incorporate other types of art and techniques that I love...like Altered Art. This fabric collage, Rose Gardens, was great fun for me. It's a little bit primitive and rustic, and a little bit shabby chic, and still with that altered art flair. This piece is about 4" x 5" in size. I'm using this as entry into the Three Muses Old Fashioned Challenge.

Rose Gardens Fabric Collage Art


I actually started this with a muslin bag that I grungy'd up with my special grungy sauce mix. I just love the look of grungy muslin, what can I say? So that is what you see on the outer edges of this piece; it serves as the background for the whole collage.

Next I took a plain piece of muslin and did an image transfer onto it using a gel medium. I used a vintage photo of a woman (I've named her "Rose") picking roses outside her window. At first I was irritated that my black and white image came out looking pink in the transfer image, but hey, what's a gal to do? I just decided to go with it. After that dried I distressed the edges of the muslin, then sewed that onto the grungy muslin bag using black thread. I just like the way the black thread contrasts with the muslin.

Then it was time to embellish, so I took some decorative ivory-colored trim and used that to frame my transfer image. Then I cut off all the edges of the muslin bag--because it wasn't really a bag anymore once I sewed the image onto it. And the nice part is that the extra layer of fabric from the back of the bag makes the whole collage a bit more firm, which I like. I frayed the edges of the remaining part of the grungy muslin bag. Then I tied 3 paper roses together with a black ribbon and sewed them to the bottom right corner of the collage.

At some point I may use this small fabric collage as part of another bigger project. But I am  happy with it as it is for now. And one fun thing for me on this...there is a flaw in the image transfer, to the right of Rose's dress, near the bottom. It's a little white spot that didn't quite transfer from the photo. But to me, it looks like a little fairy...and I love that!

Snow Angel Canvas

Well, the holidays are over, but winter has only just begun. So it's really the perfect time to create a snow-themed project as I stay indoors and try to keep warm. This is my Snow Angel canvas, and I'm entering it into the White Glitter Challenge at Gingersnap Creations.

Snow Angel Canvas Art


This is a mixed media project that I began with a plain, white primed canvas. I used ink pads to "paint" a blue background by rubbing the pad across the canvas, and then blending it in with a round foam dauber. I also added some silver ink accents using the same method, blending the colors together a bit as I went. Then I did some spatter painting with white acrylic paint, to create the snow effect in the background.

Next, I took a piece of textured white wallpaper scrap and cut it into a snowy ground shape for the bottom of the canvas. I Mod Podged that onto the canvas, and then added the vintage photo of my cute little snow angel baby. I also added a lavender rhinestone gem on the girl's dress, along with white button brads to her coat.

Then I used some white glitter letters to spell out BRR, which seemed appropriate for this snowy scene. I also added white glitter to the snowy ground so that it would sparkle a bit. And I finished the whole thing off with a white paper flower.

Tina

Friends Forever ATC

I haven't made any ATC's for awhile, so I figured it was about time to make another one. And this ATC is very girly! :) I'm using this for the Craft Your Passion Anything Goes Challenge, as well as the Ginspiration Challenge at Gingersnap Creations; they provided several inspirational themes, and we just had to pick one--I chose a photo of a jacket with a black & white design motif.

Friends Forever ATC Altered Art


I started with a piece of ATC-sized illustration board. To that I added some pink textured cardstock. Then I took some scrapbook paper that has a black & white design motif much like the photo inspiration, and I tore it on one edge and distressed it with some brown ink. Then I glued that over the top half of the ATC.

Next I added a vintage photo of two girls, one of whom is holding a pink heart. I also punched some pink heart shapes from the same pink background paper and glued them to the black & white paper. Then I stamped on a decorative heart and the words, friends forever, in black ink. I added some rhinestone gems to give the ATC some sparkle, and I distressed the edges of the ATC to give it a bit more dimension and definition.

I may have to give this to someone for Valentine's Day, don'tcha think? It would be perfect for that for sure.