Discovery ATC

This ATC is my final project as a visiting artist for the month of April at the Gingersnap Creations blog. The theme for this color challenge was Red and Gold.

Discovery Altered Art


I started with a piece of ATC-sized illustration board, which I covered with a piece of scrap wallpaper that is a metallic gold color.  Next I added the Discover vellum paper embellishment and the red ribbon near the bottom. I added a 3-D bird cutout, and also another egg cutout to repeat the one on the vellum image. And I finished it off with some red rhinestone gems on each of the top corners of the ATC.

I really enjoyed my time as visiting artist. It helped me stretch my wings a bit as an artist and step out of my comfort zone a bit too, which is always a good thing to do as an artist.

Fan and Kimono Collage

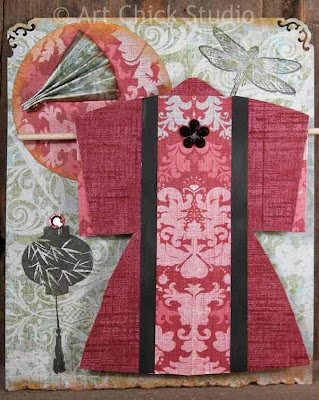
This week is another Far East Challenge at the Gingersnap Creations Blog where I am a visiting artist for the month. The theme for this challenge was Fans, so I've created a Fan and Kimono Collage.

Fan and Kimono Paper Arts


I started with a patterned piece of pastel green scrapbook cardstock paper., which I tore and distressed at the bottom, and did some decorative corners at the top. Then I stamped on an Asian paper lantern image and a dragonfly image in black ink.  I also added a patterned circle, which is supposed to represent the sun. Next I created the Kimono out of some pretty cardstock, layering the paper and adding black as an accent color. I also added a black flower gem to the back of the Kimono before I attached it to the background using 3-D O's to make it appear in relief. I added a folded paper fan to the sun image, and I also added a gem to the stamped lantern.

I think this is my favorite piece so far of the Far East projects I've done as a visiting artist. I just really like the Kimono, and I like how all the colors and patterns work together in this piece.

MJ Poses Digital Sketches

These are some other Michael Jackson Art digital sketches I did over the weekend. Instead of focusing on his face in these, I focused on some classic MJ poses that all just scream Michael Jackson!


Epic MJ Silhouette Digital Art

MJ Blood on the Dance Floor Digital Art

MJ Jam Michael Jackson Art

MJ Smooth Criminal Digital Art


I tried to pick poses from different eras of MJ's career. Smooth Criminal, Jam, and especially Blood on the Dance Floor--these are all some of my favorite short films of Michael's. So it was fun working with not only the iconic images, but also favorite videos and moments from Michael's life.

Destiny's Onesie Dress

OK, so sewing is really not something I am good at. I don't do it very often, and when I do, it's generally only things that are either very small or involve only straight lines. Let's just be honest here: we can't all be good at everything, right? But that doesn't mean we can't venture out of our comfort zones once in awhile and try to develop our lesser-honed skills. So that's what I did when I created this Onesie Dress for my granddaughter, Destiny.

I found a Onesie Dress Tutorial at the Barefoot in the Kitchen blog, after doing some Googling to find one. Hers was the easiest I found to follow. And believe me when I say, I need EASY. I followed her directions, more and less, from start to finish. And I'm pretty proud of how the dress came out, flaws and all.


It's definitely not perfect, but it's for a perfect little girl, who makes my heart smile every single day. She is my treasure forever.

Harmony Hangtag

This is my second creation as a visiting artist for the month of April at the Gingersnaps Creations Blog. The theme is the Far East and this is a technique challenge that required the use of Mists.

Harmony Altered Art Hang Tag


This began as a plain white hangtag. The first thing I did was to create a mountain-shaped stencil out of torn cardstock. I used a foam dauber and some blue ink to stencil on the mountain in the background. Then I used some Tattered Rose Glimmer Mist to create a shimmery rose-colored sky. Next I took the blue ink and distressed the tag edges a bit, and I also used a corner punch to create a decorative corner on each side of the bottom of the tag. Then I took some black ink and stamped on some Asian writing symbols over the blue mountains.

Then it was time to start creating some details. I tore some red paper and put that near the bottom of the tag, and then stamped some letters on some inked paper to create the word harmony; I cut those letters out and glued them to the red paper. Then I added some hand drawn symbols to the middle bottom of the tag. And then it was time to create my Geisha. I drew her by hand on some cardstock, colored her with some art markers, and then cut her out. I used some 3-D O's to make her appear in relief on the tag. I also drew and colored her folded up parasol.  Then I finished it off with just a a pink paper flower and a little dragonfly.

The Promise Altered Hangtag

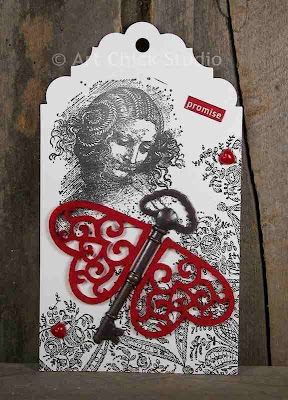
It's time for another entry at the 3 Muses Challenge Blog, and this time the theme is Keys. I'm calling this The Promise.

The Promised Altered Art Hang Tag


I started with a large decorative hangtag that already had the black design motif on the bottom right corner, which I loved. Then I stamped on an image of a very Leonardo-esque woman on the upper left in black ink. I added an aged copper-look key, which I decided to turn into a butterfly of sorts by adding some decorative 3-D felt hearts I got on clearance recently. The hearts serve as the wings. Then I added a couple of red plastic heart embellishments to help carry that red color around the design. And I finished it with a red word sticker that reads, promise.

I was thinking of the Luther Vandross song, Promise Me, with lyrics that go...

Promise that you'll leave me never,

that we'll be in love forever...

I love how it turned out. I think I might save it for a future gift!

Felt Chocolate Bunny Featured on SMW

Just a quick post to share that my Felt Chocolate Easter Bunny and its pattern were featured by Karen at the Sew Many Ways blog.  What a nice surprise!

Felt Chocolate Easter Bunny Featured


sew many ways

Many thanks to Karen for this nice recognition. There are always lots of great projects to be found at her weekly Sew Darn Crafty link parties. So be sure to pop over and have a peek!

Geisha ATC

I was recently asked to be a Visiting Artist at the Gingersnap Creations blog for the month of April. This month's theme is The Far East, and the first challenge of the month has the more specific theme of Geishas. So I created this Geisha ATC.

Geisha Altered Art

I started with an ATC size (2-1/2" x 3-1/2") piece of heavy paper that came in a paper elements pack from K & Company. It has some lines on it and the butterfly.  I distressed the edges with a bit of red ink. Then I stamped on the Asian text using black ink. Next I created the Geisha image by stamping it onto some card stock and then embossing it. Then I attached it to the ATC in relief using a piece of foam core. I added a red flower gem to her hair for a pop of color. I also added a piece of scrap burlap for some texture, along with a flower element that I added some more gems to. And I finished it off by stamping out the letters to spell g-e-i-s-h-a.


Footsteps of the Past

I almost forgot I wanted to post a Trash 2 Treasure item this week! And my Trash 2 Treasure item started out as a very old shoe. What's left of it has become a treasure for the Hubs and me, because he found it digging in the yard during some renovations one day. So I decided to frame it and keep it.

Footsteps of the Past Trash to Treasure


I don't know what the story is behind the surviving sole of the shoe, but I like to imagine that it belonged to a child who lived in our 121-year-old house way back when it was built in 1890. Perhaps the child was playing in the yard and wanted to feel the grass between her (or his) toes, so she took off her shoes to run. But then maybe her mama called her in for dinner, and she forgot about her shoes...and one can only guess what happened to it after that. But then my hubby found it, many years later, only to have it become a treasured peek at Footsteps of the Past.

Felt Chocolate Easter Bunny

Yesterday I was doing some more spring and Easter crafting. I finally created something I've been wanting to do for awhile: a Felt Chocolate Easter Bunny. I love felt crafts and I'm beginning to do a lot more Easter crafts as well. Guess I've just been kind of inspired lately.

Felt Chocolate Easter Bunny Pattern


This was super easy to make, which is important for me because it involves sewing, and that's not something I am very good at! I simply drew a Chocolate Easter Bunny shape on some white paper to serve as my initial pattern. I transferred that to cardstock and cut it out. I figured it would be easiest for me to just pin the cardstock pattern to the felt and then cut around it. So I pinned it to two layers of brown felt and cut it out. Then I did a basic stitch with  my sewing machine most of the way around the bunny. I stopped to stuff with some fiberfill, and then I sewed it the rest of the way. And then I just added a pastel blue satin ribbon to finish it off.

If you'd like my hand drawn Felt Chocolate Easter Bunny pattern, you can view it via the PDF link below and then save it to your computer. All I ask is that you don't claim the design/pattern as your own if you share it with others.