Man in the Mirror

I came across a blog I hadn't seen before that does digital art challenges each week. The blog is called Digital Whisper. This week's challenge theme is "Sheet Music," so I thought I'd jump in and participate. And my favorite musical muse is almost always Michael Jackson, so he inspired this digital art work. And the sheet music I used is from MJ's Man in the Mirror.

Man in the Mirror

I don't seem to do as much digital art as I once did. So I love when I get inspired by a great theme or challenge to make some more. :)  You can see more great digital art from this challenge by clicking on the the blog link above.

Follow Your heART

It was a busy weekend, but I did manage to get into the studio for a bit yesterday and create a new spread in my art journal. Tried some different techniques and fun with with texture by using molding past. 

Follow Your heART

I decided to limit myself to just a few colors, and I wouldn't let myself use pink or red (because I use pink a lot). So I decided on turquoise and brown, and black and white. I started by using a stencil and molding paste on the left and right sides of the pages to create the smaller circles. Then I sprtized some water on the pages and used some Mr. Huey's Color Mist sprays to create the background color. I did this by unscrewing the the spray nozzle and just dripping some color at the edge of the page. The water on the page helped the color spread, and when it needed help I just sprtized some more water on. I also picked up the pages and let it run down toward the center. 

Once that was done I used a stencil and some acrylic paint on a dauber to create the heart. I embellished it a bit with brown at the edges, and then used a white acrylic paint pen to brighten the design inside of the heart. I used a another stencil with brown ink to create the wee small circle textures here and there on the pages, and another stencil to create some small floating hearts. I used my round dauber and the turquoise acrylic paint to put circles on the pages. I created more circles of white using a cardboard tube. Then I just added some embellishment here nad there to various circles...outlining some, adding dots, cross-hatching, etc. When I was happy with the background I finished it off by stamping 'Follow your heArt.' The arrow with writing in it is also a stamp.

I really love how the background turned out in this spread. I hadn't done anything quite like this before so it was fun to do something different. And I love the color combination too. All I knew when I started this spread was that I was going to create texture on the edges of the pages, and that i was going to use the heart stencil. Everything else just evolved as I went on. So that really was me following my heART in my studio. :)

Hope Art Journal Spread

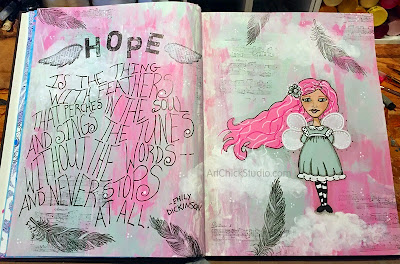
I have a job interview on Wednesday with a nearby school system for a grades 3-6 Art position. I am very excited about the possibility of teaching again. I'm trying not to get my hopes up too high, but I am all about having a little hope and a positive attitude. So my journal spread for the weekend was inspired by that hope.

Hope Art Journal

Hope is the thing with feathers
that perches in the soul
and sings the tunes
without the words--
and never stops at all.
-Emily Dickinson
Here's to hope. And maybe new beginnings.

Moms Day Mini Art

Last week I took Destiny out to the studio for some painting fun. I wanted her to create some mini canvas art for her mom (my daughter) in the style that her mom likes, which is abstract. And since her mom likes neutral colors too, that's what Destiny used.

Moms Day Art

I gave Destiny some brown paint, white, and a creamy tan, along with a brown acrylic paint pen. I also told her she wasn't going to use a paintbrush for this painting--so instead I gave her a cardboard tube, a paint dauber and a stencil. She drew some lines with the paint pen first. Then she used the dauber to create the tan circles. Then she added some brown rings with the cardboard tube. And she finished it off with white paint and the circle stencil. 

I think it turned out fabulous! Granted, I'm a little biased. ;) But it was a fun time in the studio creating this mini canvas art for her mom for Mom's Day.

Inside Art Chick Studio

In honor of Cinco de Mayo (not really, LOL), I thought I'd share a quick collage pic of the work area in my studio. I was really just in the mood to share since I snapped a few pics the other day after I rearranged a few things in there. I think I've posted pics of my studio here before, and I know I have on the Facebook page. But it never hurts to share again, right? So get ready!

Art Chick Studio

In the top left pic you'll see the very edge of my work space, and that's where I store my gelatos. My Inktense blocks are almost always right there too, along with my Neocolor II crayons, because I use all of those a lot. My iPhone dock is there too, so it's always nearby when I want to listen to some tunes. I just added some clear plastic divided storage cubes back by the wall; I added some more craft paints and my new Tombow markers in there, and on top of it are some daubers and various tools. I also have my smaller stencils hanging off the lower shelf, along with some blank tags that I add stuff to from time to time--like when I need to clean a stencil, or dab off a dauber or blender. I learned that trick from a Dyan Reavely video. She is awesome!

In the top right pic you see the main work area, jam packed with artsy goodness. My gessos and mat medium are there, along with my large variety of paint pens, Pitt artist pens and gel pens. Then there's also my main stash of craft paints, and my other acrylics are hanging from the shelf above. You'll notice that my counter space is just wood--MDF, maybe? The Hubs always meant to put a counter top in there for me. But once I got working I could never manage to clear out of there long enough for him to put any sort of finished counter in. So I just work on the wood. Since we're going to be moving out to our farm property at some point (hopefully soon), I don't see any point in bothering with counter now. We'll save that work for the new studio out there. You can also see the start of my paint brush hoard in the right corner there too. Up on the lower shelf is a variety of mediums; and to the far right (starting at the mint green binder) is clear acrylic stamp storage. I keep some in the binder, some in the accordion file on the end, and some in the smaller storage things in between.

The bottom left pic is actually to the right of my work space in the studio (it's an L-shaped counter in there). The white shelf unit is where I keep all of my rubber stamp ink pads, distress inks, sprays, and various adhesives. The counter area there is actually a large built-in light box that the Hubs made for me. It is AWESOME! But it's often covered with art books, palettes, paper towels, and whatever else I need handy at the time. I do use it, which makes for some not-so-fun times when I have to move everything to get to the light box, but oh well. And yes, that's Ian Somerhalder staring at me in the photo. Nothing wrong with having that face to look at when I'm in the studio, am I right? Angelina is in there too--because I just love her face--and if you look very carefully you may spy Nicolas Cage in there too.

The last photo on the bottom right is my aqua utility cart from Ikea. Love that thing! I keep my big stencils on there, my scissors, baby wipes, my most used paintbrushes, more adhesives, stickers, daubers, texture/journaling supplies, and various drawing pads etc. Basically it's for the stuff that I use a lot and what quick access too; but I also want to be able to move it out of the way in a hurry when I need to. It's great for all of that. I may get another one when we move to the farm, because my studio will be much bigger. Yay!

Well, I hope you enjoyed this little peek inside my studio. Hopefully within the next year or so I'll have a brand new studio to share with you. Preferably one that I let the Hubs finish the counter in before I move all my stuff in! I can't wait to move. Sigh. But I'll keep creating in the current Art Chick Studio in the mean time. :)

Let Love Grow

I was in my studio on Saturday instead of Sunday over the weekend. That was a nice change. It left my Sunday free to spend with my husband on a beautiful Spring day. I was thinking about flowers this week--hoping to plant some soon. So that is what inspired this week's art journal spread.

Let Love Grow

Lots of Mixed Media here. I used acrylics for the background; I first rolled on my two blue colors with a brayer, then scraped them on with a credit card, and finally used a baby wipe to blend the color in some areas. I used a stencil in the background too, and some acrylic paint pen. The flowers were created with a combination of acrylics and Neocolor II crayons, markers, and a touch of black ink. The lettering was stamped on with clear acrylic alpha stamps.

Let Love Grow, y'all!