Snowman Face Ornie

As I was decorating my Christmas tree the other day, I came across this country primitive ornie that I'd made for a swap a few years ago, but hadn't photographed it at the time. I thought it'd be a nice addition to the blog so I snapped a photo while I was thinking about it. I made this for a country primitive ornies swap through an online community I belonged to.

Snowman Face Prim Ornie


I started with 2 pieces of an off-white felt that I'd cut to the size and shape I wanted. Then I spritzed them with my special grungy sauce mix--though not too much, because I wanted him to be just little a little bit grungy, rather than dirty. ;) I then baked them in a warm oven for about 10 minutes or so, flipping them once, until they were fully dry.

Next I cut orange pieces of felt for each snowman's nose. Then I stitched on the nose, and then stitched on 2 buttons to be the eyes. I kept the mouth very simple and just stitched a series of X's for his smile.

After all the facial features were complete I stitched three sides, added just a bit of fiberfill to round out the face a bit, then stitched the rest of the way on the outside edges of the felt. And I finished each one off  with a green and ivory gingham fabric strip for hanging.

I love the simplicity of country primitive crafts. They are just full of warmth and fun and have a sense of home. And these particular ornies are so easy to make. I think I had to make about 15 or 20 of them for the swap I was in, and it didn't take me all that long to complete them all. And my smiling snowman looks sweet on my tree too!

I've also linked this project up at the Sassy sites blog for their Christmas Creations Using Fabric Challenge. Be sure to take a peek at their blog to see lots of other wonderful and creative holiday fabric creations!


Sisters Fabric Ornie

I've been decking the halls this past week, and trimming the tree as well, and that gave way to some creative inspiration. I decided to make some fabric ornies for my sister and my mom that they can hang on their Christmas trees. And I wanted to also include a vintage photo on each ornie, one that would be special for each of them. So this is the first one I made for my sister, which includes a photo of her and me when we were young.


I started by choosing some fabric that I love and have used with other projects. It has a very vintage feel to me, with a soft, muted tan background and little burgundy rosebuds on it. I cut two pieces of fabric to the size I needed, approximately 3"x4", so that it would be a bit bigger than the photo when it was finished.

Next I used Avery Printable Fabric to print out the photo. The fabric is so easy to use: it can be sewn on, or simply ironed on, which is what I chose to do. After ironing on the photo, then I added my decorative trim around the photo. I used fabric glue to get it in place, and once that dried I also tacked it on with a few stitches to be sure it would stay in place over time. I also added a satin ribbon flower as an accent.

The next step was to put the right sides of the fabric together, and then sew it together on three sides. I left the bottom side open so that I could then stuff it with fiberfill. After sewing and turning and stuffing, I sewed the bottom edge closed. Then I added the lace trim at the bottom, and finished it off with a  burgundy satin ribbon for hanging.

I made some other fabric ornies as well, but I'll be posting them after Christmas, so as not to ruin the surprise for anyone else I'm sending them to. ;)

I love how all the ornies turned out. My only irritation is that I think they would have looked better if I'd added a sepia tone to the photos instead of just leaving them black and white. I think they would have matched the fabric better that way. But oh well. At least I'll know for next time. And either way they are still what I hoped they'd be...a special way to capture moments in time of our family.

I also am using this as an entry into the Gingersnap Creations Vintage Hues Color Challenge, as well as the Craft Your Passion ~ Anything Goes Challenge.

Note: TatteredSisters.com is one of my other blogs. :)

Country Primitive Mitten Ornie

I recently participated in the annual Ornie Swap at Prim Mart, something I try to do every year. There's nothing like creating a bunch of ornies and knowing that you're going to get a box full of handmade ornies in return each year. My tree is full of the most beautiful handmade ornies and I just love it! For this year's swap I did a simple country primitive mitten ornie with a rusty snowflake accent.

Snowflake Felt Craft Mitten


I started by drawing a mitten pattern on some cardstock and then cut it out. I pinned it to two pieces of white felt that I had pinned together and then cut out the 2 mitten pieces, front and back. Next I sewed the two halves together using black embroidery floss. I love the look of the stitching going all the way around, and it's very country and prim! Next I took a black button and used white embroidery floss to sew it to the rusty snowflake accent. Then I used a rusty safety pin to attach the snowflake to the front of the mitten, and I stuffed the mitten with just a bit of fiberfill. Then I finished it off by attaching a piece of embroidery floss to serve as the hanger for the mitten.

I really debated making this mitten ornie grungy...it's definitely the primitive way to go. But I liked it so much the way it was, I decide to just leave it that way. I made 28 of these for the ornie swap, and I got my 28 handmade ornies in return just the other day. They are now hanging on my tree and they look beautiful.

I don't know about the rest of you, but around here, it's beginning to look a lot like Christmas!

Happy Thanksgiving!


Sweet Face of Time Hang Tag

Here's another altered hangtag creation I've made using a less-is-more approach. Sometimes I get a bit carried away with embellishments and details and I forget that it's OK to just do something simple. Yet when I give myself permission to do something simple, I usually love how it turns out.

Sweet Face of Time Altered Tag


I started with a plain manila hangtag that I used my secret grungy sauce mix on to get it good and grungy and give it that aged look. Then I took a fabulous Paper Artsy rubber stamp and stamped on the design, which features a cute child's face, and clock, and some design motifs. To that stamped image I added a black button brad to the center of the clock image. I also added a black leaf sticker, and finished it off with a black ribbon at the top of the tag.

I love how this turned out. Hope you do too. I will always enjoy doing my busier more detailed projects, but it's a nice change of pace to do something a little bit different once in awhile.  I'm also using this for the City Crafter Challenge Blog's Little Children Challenge.


Notions Fabric Hang Tag

This altered hangtag is a bit different than what I usually make, since I usually make hangtags out of paper and blank tags. For this one, inspired by the Gingersnap Creations Sewing Notions Challenge, I created my fabric own hangtag from scratch using fabric!

Notions Fabric Handmade Tag

I started with some lovely vintage-looking floral fabric that is tan in color and has some delicate burgundy-colored rosebuds on it. I cut it to the size I wanted (2-1/2" x 5"). Then I found some scrap muslin fabric that I had already made grungy using my secret grungy sauce and I tore the edges to distress it, and to make it fit on top of the other fabric.  I sewed the muslin to the floral fabric using black thread, to give it some good contrast to the fabrics I was using. I didn't want this to look all perfect and clean-edged; I wanted it to look aged and worn, and a bit rustic. After I sewed on the muslin, I then sewed the two pieces of floral fabric together as well.

Next I gathered my sewing notions and embellishments: a Tim Holz metal key, a copper brad, a brown button, a brown satin ribbon with a pearl bead accent, some tatted lace trim, and a rusty safety pin. I poked a hole in the fabrics to make it possible to attach the key to the tag, and used the brad to do just that. Then I sewed on the button, and then also sewed on the brown button. I finished the bottom edge with the tatted trim, and then used the rusty safety pin to attach the brown satin ribbon to the top of the tag.

I am finding that I really enjoy working with fabric. Sewing isn't one of my stronger skills, so I'll need to keep working at it. But in working on this tag, I was really getting some fun ideas for creative fabric projects I could try. I really had fun with it...except for all the times I needed to thread a needle, which is difficult to do without the bifocals I really need to get one of these days. Darn my aging eyes anyway! I also like the idea of doing a more tattered-style of sewn creations--much less worry about perfection gives me lots more creative freedom (and less stress). And as Martha would say, that's a good thing.

Here's to more fabric projects in the future! Have a great Wednesday.

Mama's Dance

I had so much fun creating in my studio today. I only managed to get one project finished, but sometimes I spend more time in creative thought than in creative action, as was the case today. Sometimes I just have to spend a lot of time making sure everything is as I really like it before I can call it complete.

This project features a vintage photo of my mother. She was not quite four at the time, and she's the picture of prettiness in her fashionable dress of the day. I do believe my great-grandmother made this dress for mom too, which makes it even more special.

Mama's Dance Canvas Art


I used a plain white canvas as the base for this project, since I was going for mostly a black and white color scheme. However, in looking at it (and debating it for quite some time!) I decided that the white canvas was just a bit too white. So I used some Old Lace colored Glimmer Mist to spritz the entire canvas and give it a bit of shimmer. I did the same to the black and white-patterned scrapbook paper that I tore and distressed next, and then adhered it to the canvas. Then I added the photo of Mom, and I used four black brads and some Mod Podge to glue that to the paper.

If you look closely at the photo, you'll hopefully notice the pearl beads I added to represent the necklace Mom is wearing in the photo--it looked like pearls to me, though the photo is kind of small (3x4) so it's difficult to know for sure. But I liked the idea of giving the piece a 3-D effect with the pearls, and I think it looks neat now that they're on there.

After the pearls, I added a black satin bow with a pearl accent to the top of the photo. Then I added some alphas to spell out the word, Dance, because to me, she looks like she's ready to dance. I finished off the edges of the canvas with some decorative black trim. It's difficult to see it in the photo, but it really helped to give it a finished look, and tied in all the black together.

The inspiration for this piece, aside from my cute little mama in her perfectly fashionable little black dress, was the Gingersnap Creations Haute Couture Challenge, the theme of which was fashion. I'm also using it for the Craft Your Passion Challenge for this week.

Family Shadow Box

I use so many vintage photos in my altered art projects. I just love the way they look. So when my mom came for a recent visit, I asked her to bring as many old family photos as she could so that I could start using actual family photos, rather than just vintage strangers that catch  my eye in photographs. Mom brought some wonderful photos, so I'm off to a good start in building a collection that will not only help me to be creative, but will be extremely meaningful for me as well.

For my very first effort, I decided to create a shadow box of sorts. I have several of these small square boxes around, made from old lath board. They measure about 6" square on the outside, about a little over 5" on this inside. To me, these rustic boxes were just begging to be altered and transformed into meaningful family art. And this one features my great Grandma and Grandpa Kephart. Definitely art with heart.

Vintage Photo Shadow Box

I started by finding some decorative scrapbook paper that I wanted to use on the background. I found one a with rose, pink and blue-green colored pattern to it that I really love. So I cut that to size and put it in place in the box. I already knew that I'd be using the photo of my great Grandma and Grandpa, so next I went about looking for the right embellishments. I found a decorative paper element that says Family on it in a Tim Holz paper pack, so I cut that out to use. I also found a great paper rose that has a hint of glitter on, and the color matched the background paper perfectly. I found some old lace that I ran some thread through to create a fan effect under the rose, and I grabbed some old buttons as well, since the paper element has buttons on it, so I thought they would be a nice touch.

I used foam core to help me create depth with the items I placed in the shadow box. I used it behind the vintage photo and the paper element. The different depths of the items is a perfect way to create shadows in the box, and it makes it look more interesting too. I used some foam to raise up one of the buttons as well.

I love this piece, mostly because it has personal meaning for me. Now all I really need to do is find the perfect spot in my home to hang it. And I will definitely be  making more of these shadow boxes too!

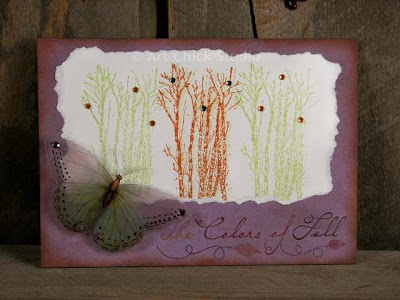
Colors of Fall

This creation is another piece inspired by a Gingersnap Creations challenge; this one was their Color Challenge: Eggplant, Pumpkin, and Avocado, all colors inspired by Fall.

Colors of Fall Art


I started with a simple piece of cardboard. I prefer to use chipboard when I create altered panels, but couldn't find any at the time (I hate running out of things when I'm starting a project!), so I just used what was handy. I covered the cardboard with some scrapbook paper of Tim Holz' that has light purple (the "eggplant") color to it and it's very distressed looking, which I love. Then I took some watercolor paper and stamped on the trees in pattern of three, with 2 sets of trees in green (the "avocado") and one set of trees in a rusty orange color (the "pumpkin"). Next I added rhinestone gems to the trees to create some sparkle; I added orange gems to the green trees, and green gems to the orange trees. Then I tore the edges of the paper and adhered that to my paper-covered cardboard.

I found a plastic butterfly embellishment that has green and a hint of light purple on the wings, and also some orange spots on the wings too. But I decided to add some sparkle to the wings as well, so I added some light purple rhinestone gems there too. I used a piece of foam to adhere the butterfly to the panel, to give it a raised 3-D effect. And I finished it off with a rub-on that says, The Colors of Fall.

So that is my homage to Autumn for this challenge. :)


Paris Arches Altered Hang Tag

This altered hangtag was inspired by the Gingersnap Creations Random Redhead Challenge for November, the theme of which is Arches. I'd never done anything with arches before this, so I wasn't exactly sure how I'd approach it. But I decided to use my love of all things Paris to help me find my way, and I'm very pleased with the result.

Paris Arches Altered Tag


I started with a plain white hangtag that I then covered with some photographic scrapbook paper that I'd gotten as part of a travel kit at Hobby Lobby recently. I'd forgotten I even had it actually, but found it when I was skimming through my paper supply and knew it would be perfect for this challenge. It has a blue-gray tint to it, so I worked with that as the focal color for the hangtag.

Next I began to add the embellishments: an Eiffel Tower sticker,  a vintage style Paris postmark stamp, a dimensional butterfly sticker that I added some blue highlights to, some postage stamp stickers, and another dimensional sticker as well. I also added a sticker with the word Paris on it...I like having a text element in most of my pieces anyway. Then I finished the hangtag off with some blue rhinestone gems and a light blue organdy ribbon.

C'est magnifique, no? LOL :)